

Over the past few months, while we’ve all been confined to our immediate places of residence, I’ve had the unique opportunity to devote some time to this new (sort of) project of mine; the NDF ISF.
If you can make it through this entire article, let me preemptively say thanks for reading – I’m impressed. You should know going into this it’s not the most engaging build, but for anyone who is interested in building one of these cars for dual duty purposes (commuter/track), I think there are a lot of good takeaways within this article.
I picked up this car back in September of 2019 partially because I wanted a more comfortable daily that could double as a weekend track car, and partially because a few weeks prior to the purchase I had the chance to take a rip around town in my friend Will’s (@illwillem) already modified one and immediately got hooked on the solid, OE power it provided. After discussing in-depth with Will the slept-on potential of the chassis, I promptly began my search for one. The goal was to build a street car with carefully chosen parts that would maximize the potential of the car on track without sacrificing it’s ability to comfortably perform as a commuter. As opposed to replacing as many things as possible, I wanted to highlight the car as it was built, modifying only what was necessary to make the most of the chassis.
It wasn’t too hard to find many used options, however many of them were slightly overpriced with high mileage. I happened upon a classified ad in the South Bay that was a bit intriguing and after chatting with the owner a few times we agreed to meet to discuss the sale. While aesthetically the car had some pretty glaring flaws, it seemed that mechanically the car was sound aside from the dreaded ‘valley plate leak’ that almost all ISF’s suffer from. Factoring in about $1,000 worth of body work that I would eventually end up doing to the car, we agreed on a price and shook on it (back when handshakes were a thing); the next day we met up at the bank and completed the sale.
I promptly drove the car to my body shop and dropped it off to have the exterior damage repaired and parts of the car repainted. There were two dents on either side of the rear door jams that looked like someone slammed the door over the seat buckle over and over again. I have no idea where they came from but they were almost symmetrical; really odd. A couple dents on the rear bumper, front bumper, and some damage on one of the side skirts were also taken care of and blended to give the car a refreshed look. After a week or so I got the car back just in time for a track event at WSIR. I wanted to get a personal baseline on how the car drove as I don’t really have experience with a high power, rear wheel drive car; needless to say, it was an eye opener.
In its then current form, the car had the OEM 19″ wheels with a staggered set of Michelin Pilot Super Sports (225/245 respectively), and during my first session out on track it was extremely apparent that this tire size and compound was not what the car wanted to be on. Even out of sport mode the corner entry speed was abysmal. Trying to manage corner entry while juggling the poor tiring sizing and weight of the car was laughable, and powering out on corner exit was not an option. I spent most of the day correcting oversteer, but all things considered it was a great learning experience. I was able to cut my lap time down to a 1’35 (at Streets CW); not quick by any means, but I had gathered some good feedback. I also noticed that the water temps were fluctuating wildly and the oil temp had crept up beyond ideal operating temp at one point on track. I knew that there was the potential for cooling issues with the car leaking fluid out from the valley plate, and not being privy to the maintenance history of the car, I erred on the side of caution and reached out to Koyorad for solutions.
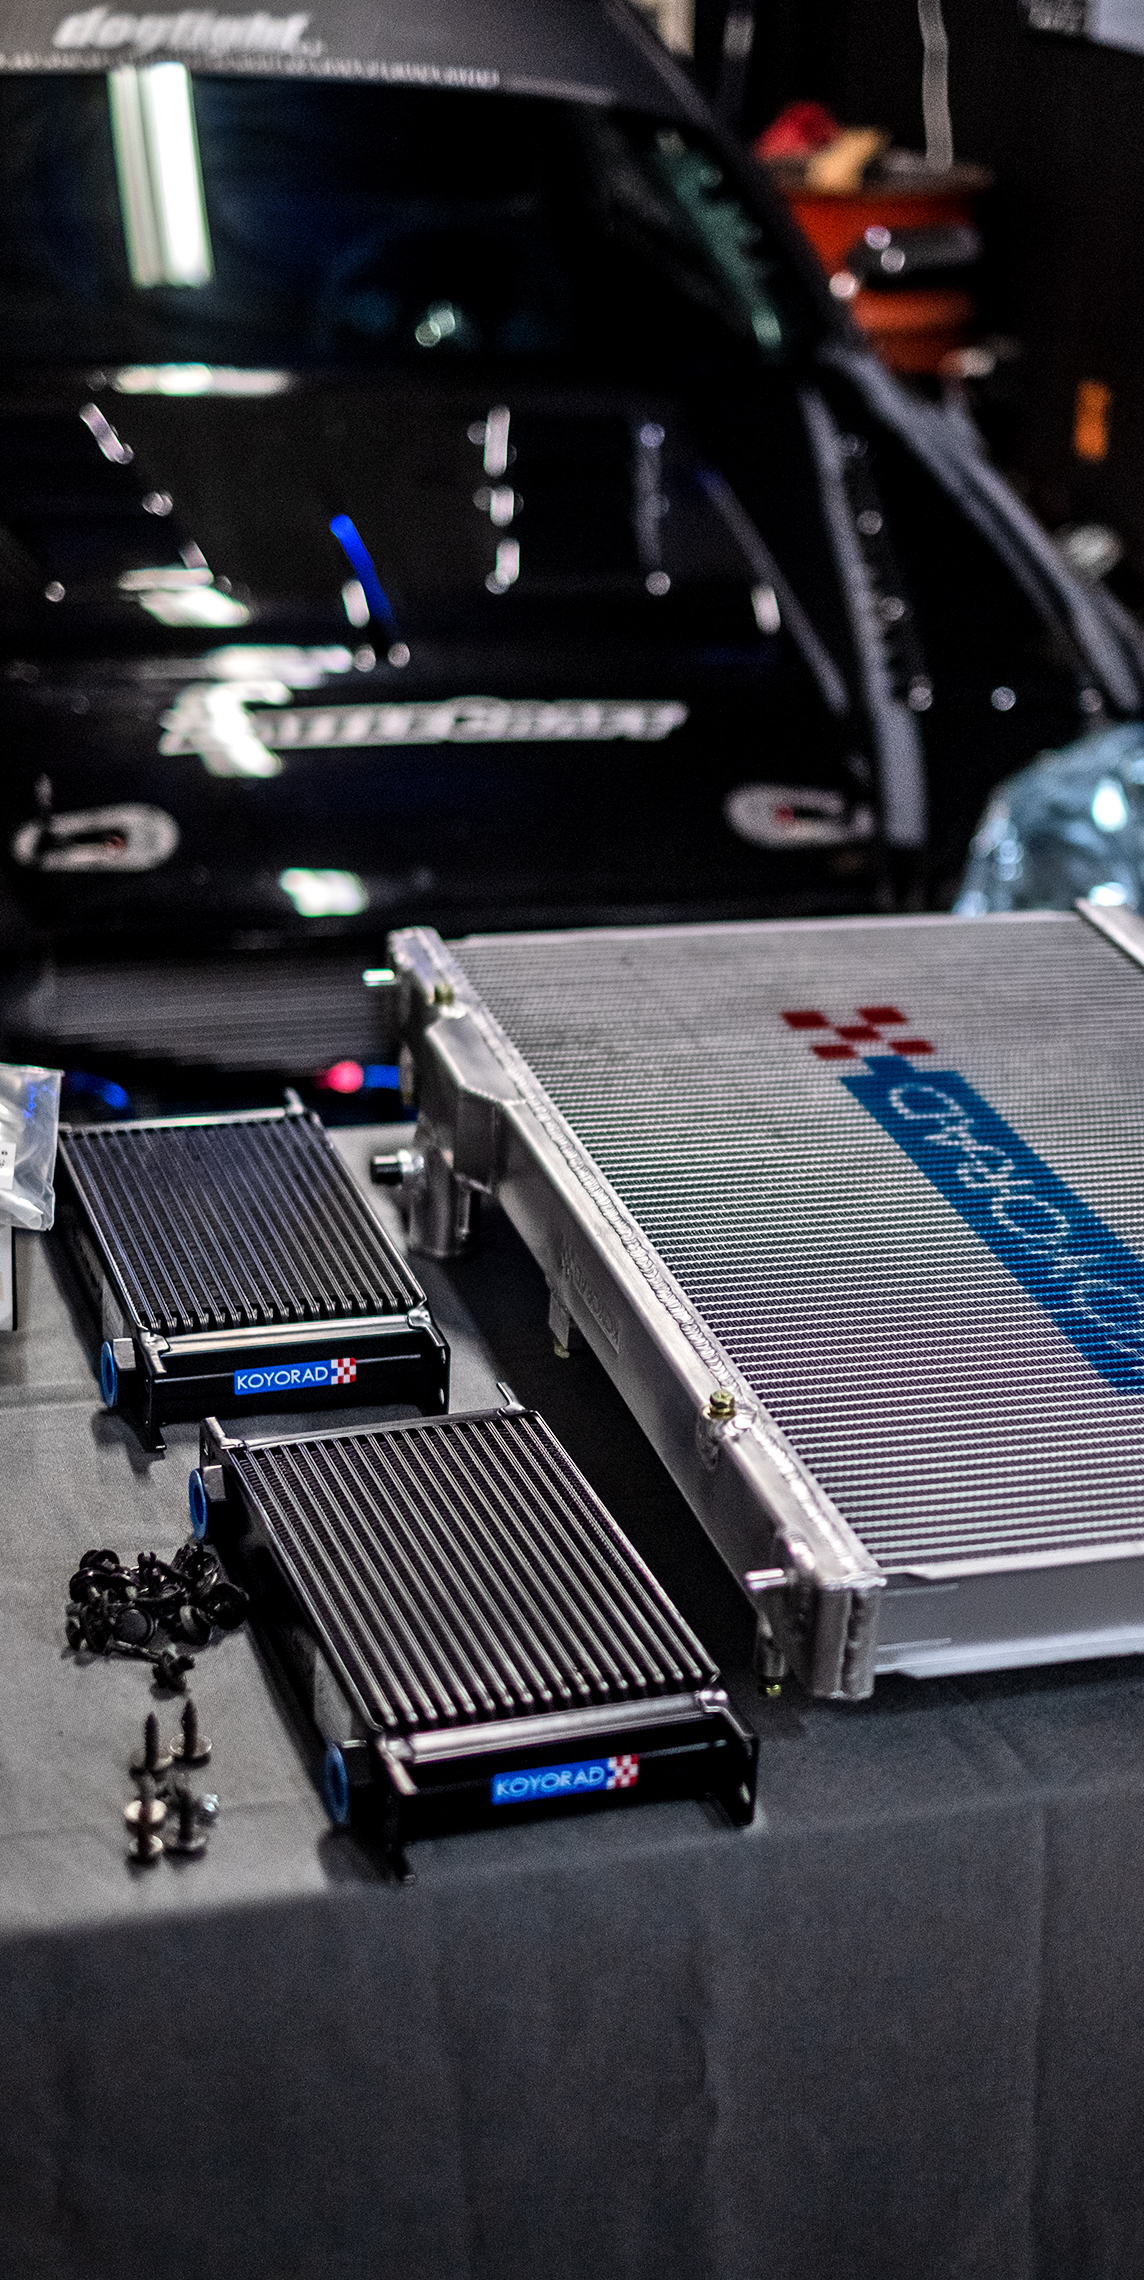
Removal of the cooling system on this car was fairly straightforward. However, the OEM radiator incorporates an internal trans cooler, and because we were replacing it with the Koyorad aluminum unit (Part # HH012170), we needed to install a secondary trans cooler to replace it as the OE heat exchanger is housed inside the OE radiator. For that we went with a Koyorad 19-row cooler for both the transmission fluid and engine oil. I’ve had great results with the same cooler on the Civic race car; the Koyorad coolers are a drawn-cup style heat exchanger that are lightweight and have great build quality. For the trans cooler, I utilized the OE hard lines that ran to the old radiator and for the oil cooler I incorporated a sandwich style adapter with thermostat on the filter housing from Setrab for the AN-line provisioning. I made brackets for the coolers and mounted them on either side of the radiator support and ran the lines accordingly. The radiator fit was literally perfect as I’ve come to expect with Koyorad, and aside from trimming some of the plastic shrouds to accommodate the coolers, they were able to be fit relatively easily as well. Had I not had to wait weeks for the parts the install would have been done in a day; but in typical fashion I had to put things off for awhile. While the fan and radiator were out I also replaced the water pump with an updated OE design. The first-gen one was known to leak.
After the car was back down on the ground with new fluids, I also took the time to install a Recaro RS-GE fixed back and seat PCI rail, with a modified buckle extension so the OE 3-point sits correctly. Driving the car on track in the stock seat was difficult to say the least. At any rate, it was done and a week or so later I headed back to WSIR for a second baseline.


This time around I sort of new what to expect and the car behaved predictably once again; sans the cooling issues which were all but gone now. In fact it took about 50 miles of driving for the car to get up to ideal operating temp, which makes me think that for Winter events I’ll have to make a cardboard block off for the cold morning drives to the track.
Anyway, it was nice to not have to worry about checking temps or pulling off track and I could concentrate on trying to control the car. I had a lot of fun this second time out as I became more confident with sliding the car around. While I cut about 3 seconds off my previous time to a high 1’32, of course it was still a little disappointing to be 8 seconds off my personal best. I kept having to remind myself that I have no idea how to drive it still and it’s lack of grip, while detrimental to lap times, was the cars main source of entertainment.
Simply put; this car insanely fun to drive.

After those two track days, I didn’t do much with the car but wait on parts. The COVID-19 response hit pretty hard and we were relegated to staying inside, which coincidentally gave me time to work on the car but also came along with feelings of uncertainty which sort of morphed into a lack of motivation for awhile. I snapped out of it eventually and decided to utilize the time I had more efficiently. The parts list for the first ‘stage’ I guess you could call it, of modifications, was concise, and chosen with the help of Will who had already undergone this process with his car and had since moved onto a completely mind-blowing build (which you’ll see more of later). I wanted the power level to remain unchanged and so we focused on the suspension and setting the car up how I envisioned it should have been from the factory.
The next time the car was up in the air, I installed a set of KW V3 coilovers, SPL rear camber arms, and RR Racing USRS (Ultimate Steering Response System), which are basically upgraded compliance bushings in the front lower control arm. The USRS should be a mandatory install on this car as it did wonders to improve the steering feel and turn-in response. The ISF is so front end heavy that the OE bushings did little to help control it. To further help tighten up the front end, I modified the OE front sway bar by drilling new end link holes and reattaching the end-links at the new mounting points.


Because the car was getting aligned at ZERO Auto Factory, I took full advantage of the time it was on the lift and we installed the USRS bushings while it was on the alignment rack as it would have been miserable to do it while on jack stands. With the KW’s at the desired ride height and corner balanced, the natural camber of the front sits at about -2.3; almost perfect without having to purchase any arms. The rear we adjusted to -1.5 and set toe to 0. The USRS housing slightly increases static caster by 0.3 – 0.5 degrees which benefits camber gain mid-corner.
The car actually feels less harsh on the street and freeway with the KW’s on it than the OEM suspension does.

I had been hoarding a set of 18×10 +35 ZE40’s since about the week I bought the car, but was waiting for the suspension to be installed first before putting them on so I was excited to finally see what they looked like. I went with the Diamond Dark Gunmetal as I wanted it to match the OE wheel color as close as I could. I had R Compound install a square set of 265/35/18 of Advan’s Apex V601 tire. At the time I made the choice to go with these tires they were still pretty new to the market and not much reputable testing had been done on track locally to us. I figured it would be a good compromise to running a 200 treadwear tire as this car is primarily a commuter and the 25,000 mile warranty wasn’t a bad thing to have.


That’s Will’s ISF inside the garage.

A couple other aesthetic changes I installed while the car was in between events was a Seibon vented carbon hood, an Alpheyga carbon lip/splitter, and our universal carbon side strakes.
This brings us closer to present day. I was able to take the car in it’s new and improved form back to WSIR for a Streets event on May 16th. At this point I wasn’t sure what to expect with the new changes, but I was apprehensive on setting a goal as I’d never driven on the Apex tire before and neither had anyone else I knew. During my first hot lap I went into turn 1 with a little too much confidence for the tire to handle (and my driving skill), and basically holding oversteer all the way into turn 2. Okay, good check on the tire performance; not quite what I was expecting. While the tire didn’t have the grip I thought it would, it was still way more predictable than the Michelins that were on before, and coupled with the upgraded suspension and camber the car felt much better than it did in its stock form. It really did start to come alive.
In some corners there was slight understeer with the tightened front end and new alignment, but on the turns that had a tendency to promote oversteer the car wouldn’t just throw the rear end out like it used to. It was much easier to feel the rear tires falling off now and correct before it scrubbed too much speed. I was finally able to give it a little more power on corner exit as well without it kicking the rear out; the car really does like the square setup. Driving this thing just gets more and more fun. I was able to bring down the lap time another 3.5 seconds to a 1’28.7 – better but still not where I’d like it to be. Albeit a new experience for me, I think with a few more consistent events, I’ll be able to get the car to a 27 on the Apex tires. Eventually, I would enjoy seeing a 1’26 on a better compound which would put me just 2 seconds off my Civic time.
As luck would have it, just a week later, I was offered a spot in the upcoming filming of Driving Line’s ‘Nitto Driver Battle’ series at Chuckwalla Valley Raceway at the end of May. I happily obliged as the more seat time I can get in this thing the better, and there’s nothing better than a free track all to yourself. Wanting to represent the car as best we could, I gave Will a call and asked if he wanted to drive it for the event as I’d never driven CVR in this car let alone enough experience to max out it’s potential there. He was happily on board so I spent the next couple nights getting the car ready. We mounted a set of 275 series Nitto NT-01 on Will’s Advan TC4 wheels (18×9.5 +43) and made use of the extra space under the fenders with the narrower wheel. I raised the car a little bit just to be on the safe side – I didn’t want to get to CVR and have to work on the car (although I ended up having to do that anyway).
The OE pads were pretty shot, and CVR is notoriously hard on brakes, so I had Kristian at Battlecraft order me some Project Mu HC+ Pads. I am accustom to this compound as I use it in the Civic and have come to enjoy the feel and how the brake comes on. What I forgot to do, however, was to bleed the basically destroyed fluid and replace with the multiple cans of Project Mu fluid I have sitting on my shelf in the shop. I was tired and it was an huge oversight that would come to bite me at CVR.

After the end of the first session at CVR on Monday morning, Will pulled into the paddock with the brake pedal all the way to the floor with no results. The fluid had boiled over and I had no choice but to buy some Prestone fluid from one of the corner workers who happened to have some in their trailer and bleed the brakes to give us another couple laps; I ended up doing this twice and in 100 degree temperatures with no shade it was exactly what I didn’t want to have to do.
Random but worth noting that I got almost 30 mpg on the drive to CVR the night before.

That ended up being a long albeit very fun day at the track. I should have taken more photos in between sessions because it really was like a private event with good company. I guess I was just sort of living in the moment though; not something you get to do often as a photographer.
After the timed portion of the event for Nitto was over I took the car out on track, and on my second hot lap was able to clock a 2’11 before the transmission started acting very erratic. I wasn’t sure if it was some sort of limp mode, but it just refused to put power down and would not downshift to 1st gear. Later I read that it was a possible fail safe after the car had been over-revved. I pulled in, shut the car off, started it back up again and it seemed to be fixed, so I set off back on track again. I got one more hot lap in at a low 2’10 before the same issue started happening and the brakes started to fade. At this point I was very curious as I hadn’t over revved the car at all, in fact I had been shifting very sparingly. Being the cautious person I am and knowing Will and I had a 3 hour drive home, I hung it up for the day with the confidence of knowing I could have probably cut another 2 seconds off with more seat time and cooler temps. By that point it was later in the afternoon and we were inching up on triple digit temps. Thank goodness for the Koyorad components on the car – despite the valley plate leak the car’s temps were stable all day, and between Will and I we beat the shit out of the car.
The next week, I addressed the possible transmission issue and ordered a new trans filter, pan gasket and picked up several quarts of OE ATF fluid. I dropped the transmission pan and cycled new fluid through the torque converter and topped/leveled off the transmission fluid at temp; ensuring the fluid level was accurate. These transmissions are very temperamental if low on fluid, so I wanted to rule out the possibility of losing too much fluid during the cooler install. It’s been a few weeks of daily driving with no issues and the shifts feel great; no more hanging in manual mode. I guess we’ll see if everything is fine next track day.
Which leads me to present day. I still have the NT01’s mounted on the Advan’s sitting in the shop and would like to hit WSIR one more time before Summer rears it’s fangs to see what I’m able to do with a proper tire with the current setup. I’ve been taking notes specifically at Streets as it’s the easiest track for me to record/document on as it’s the track I have the most experience with. I guess I’ve unknowingly chosen it as the testing grounds for this build.
Admittedly, I was negligent in taking photos of this car as I went through the build process. Over the past few months I’ve been focused on a few other things and photography sort of took a backseat. Even though I had (still do) the intention of documenting this build in depth, any time I went to work on it I just never had my camera in mind. Anyway, this was definitely word heavy for a first post, but it’s more for my personal reference. I’ll try my best to get better pictures in the future.

Here’s a small preview of what Will has been up to with his ISF – I’m working on putting together a feature of this car soon. Makes mine look like it should be sitting in a Car Max parking lot.
Super nice wheel choices. The ZE40 suits it wonderfully. The new TC4 make it appear like a track warrior
Thanks! I like how the ZE’s retain somewhat of an OE look
I’ve missed the lost art of blogging, actually READING the story not just browsing photos. I’m not sure why it’s taken me so long to actually look at the website as opposed to just your IG page.
Great work, i am incredibly eager to see further results and read more updates, AND certainly excited for Will to give more updates on his too! hah!.
Instagram is really convenient for image sharing! Most of what I do is in writing though – thanks for checking out the website and glad you liked it!
I should really convince my wife to sell her 13′ and get a 14′ or newer ISF model. The thing is the 13′ is paid off and she really likes her IS250 lol. I really enjoyed this build document, thanks for sharing this with us.
Maybe you can subsidize her for the extra gas she’ll be using with the V8 haha – glad you enjoyed it!
i love isf’s toyota made Club sport version these cars love the track, cant wait to see more
Thanks for documenting your journey, always fun to see different builds and what people are doing to their cars.
Was wondering if you can recommend the shop that help you check/level set your transmission fluid? I also have an ISF and based in socal, and looking to have my trans fluid levels checked out and leveled but because of the complexity of the process would like to have an experienced shop doing this.
This is my shop, I did the work myself – feel free to shoot me an email if you have any specific questions. I can try to help.
Pingback:Feature: Koyorad x NDF Street ISF V.2 – Team NDF Testing
Nice build! Any modifications needed to the fenders for the wheels and tires to fit with the ZE40s?
Thanks, Brad! No modification required other than at least about -3-4 camber up front and some trimming of the liner. Natural camber from lowering it is enough but it will still rub.
Cool read really like this track/street driven ISF. Do you plan to go 275 or wider and do you think you would need a fender roll then? Are you around 32 psi cold for when on track?
Thank you! I can fit 275 or 285 now with the current alignment. The rear fenders have already been cut and rolled. PSI depends on the tire, for the NT01’s I’ve been putting them around 24-25 cold. 32 cold for most tires is much too high. It varies with compound, but 29-32 hot would be good to shoot for in general.
Pingback:Feature: Koyorad x NDF Street ISF V.5 – New Year Updates
While I like the idea of the Koyrad radiator it is not plug and play so no go for me. Hand making brackets for the oil cooler and transmission cooler makes it a no go for me. If Koyrad has those bracket in a kit then I am all for it. Lexus is know for quality so why hand make things such a nice car?
You won’t find too many ‘plug and play’ kits for the ISF. Koyorad sells the cores, just like other companies, separately to allow fabrication to any application.